Do you want to install applications on your iPhone without worrying about revoked certificates? You’re in the right place! Here, we’ll teach you how to use a non-revocation DNS certificate. This way, if Apple revokes a certificate, you can continue installing IPA files without any issues. It works with iOS 14 and later versions, making it perfect for modern devices. I’ll guide you step-by-step on how to use it with an iPhone 14 Pro running iOS 17.4. Let’s get started!
Steps to use the DNS Anti-Revoke feature
Using DNS Anti-Revoke is quite simple; you just need to follow a few easy steps. Ready to start? Here’s a foolproof guide to ensure your setup and functionality are correct.
Step 1: Use your browser
First, open your Safari browser. Once inside, go to the website nhutgg.io.vn. There, you’ll find a vital link to install the non-revocation DNS certificate. This is a key step to get everything working!
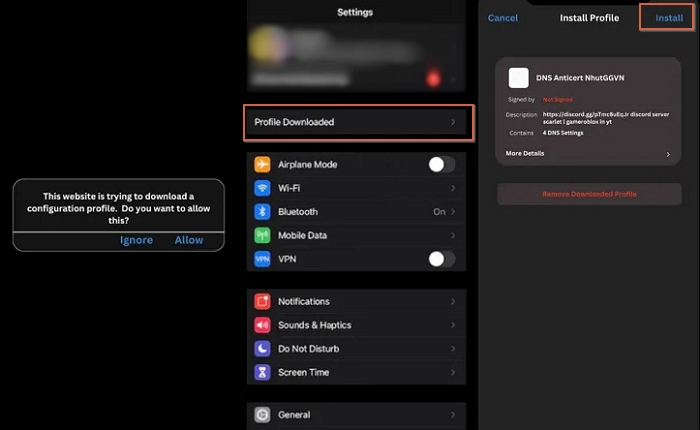
Step 2: Install the DNS profile
- First, check the guide on how to customize DNS installation and click on the DNS installation link.
- Then, return to your home screen.
- Now, go to the Settings menu on your device.
- Next, find and click on “Profile Downloaded.”
- You should see the DNS anti-revoke profile there. Tap Install in the upper right corner.

- Enter your security password and tap Install again.
You’re all set! Your DNS profile will install correctly. It’s that easy!
Step 3: Install certificates
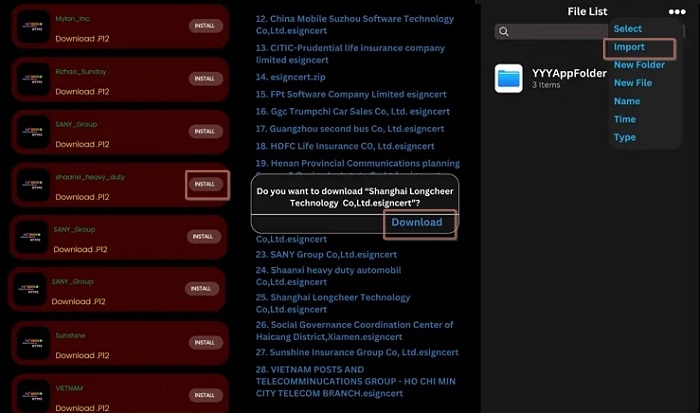
- Go back to nhutgg.io.vn.
- Now, install the certificates one by one, following the instructions on the page.
- Tap Install, go back to your home screen, and wait for the process to complete.
If you see the notification “Cannot verify,” don’t worry. That means the certificate doesn’t work with the DNS. Just try another certificate until you find one that does work for installing the app.
Note: If an app won’t launch, make sure to delete or uninstall it first before trying another certificate. This way, you’ll avoid confusion and it will be easier to install what you need!
Step 4: Trust the certificate
- When you see the message “Untrusted Developer,” it indicates that the revoked certificate is working on your device.
- Go to Settings > General > VPN & Device Management. Then, tap Trust.
Step 5: Get the .p12 Certificate
- Download the .p12 certificate from the website nhutgg.io.vn.
- Ensure you’re downloading the same certificate that you used in the app you installed. This way, everything will work correctly with the DNS and the anti-cert you configured.
- Once you’re ready, import the revoked certificate to ESign.
- Tap Import and select the certificate you downloaded.
- Finally, press the certificate and choose Import.

Step 6: Upload IPA files
- The first thing you need to do is import the IPA file using the revoked certificate.
- Choose the app you want, for example: TutuApp, tap its icon and select Sign.
- Although you see a red message indicating that the certificate has been revoked, don’t worry. Just click Install.
- Now, check your home screen. Is the app showing there? Awesome!
With this, you’ve loaded your first app.
Testing the DNS Anti-Revoke system
Now that you have the app, it’s time to test the DNS anti-revoke system. Ready to install another app? Choose another application, like Drupe, and do this:
- First, import the IPA file and go to the app menu.
- Tap the app icon and select Sign.
- Click Install and return to your home screen.
Is the app installed? Perfect! With this, you confirm that the system is working as it should. Enjoy your apps!
Advantages of using DNS AntiCert for app installation
Using DNS AntiCert to install revoked applications on iOS has several advantages. Here are a few:
- Access to unofficial apps: You can install apps that aren’t available on the App Store, broadening your options.
- Avoiding revocations: With DNS AntiCert, you can bypass certificate revocations, ensuring your apps keep working.
- Easy installation: The installation process is straightforward and doesn’t require a jailbreak, meaning you can keep your device’s warranty intact.
- Improved security: By using a specialized system, you can benefit from an additional level of security when installing apps from external sources.
- Quick updates: Many of the apps you can install using DNS AntiCert often receive updates more quickly.
- Customized experience: You can configure and use applications that fit your specific needs, enhancing your interaction with the device.
Frequently asked questions
Here are some common questions that can help you:
What iOS versions are compatible?
DNS Anti-Revoke works on iOS 14 and later versions. So if you have a recent iPhone, you’re all set.
What is DNS Anti-Revoke?
It’s a method that allows you to install applications without worrying about whether Apple revokes a certificate. Perfect for keeping your apps!
What do I do if a certificate isn’t verified?
If a certificate isn’t verified, just try another one. Sometimes, not all work well.
How can I trust a certificate?
Go to Settings > General > VPN & Device Management and tap Trust on the certificate. Ready to use!

